
- HOME
- Survival Gear
- Emergency Survival Kits
- 72-Hour Emergency Kit
8 Steps To Building a Complete
72-Hour Emergency Kit
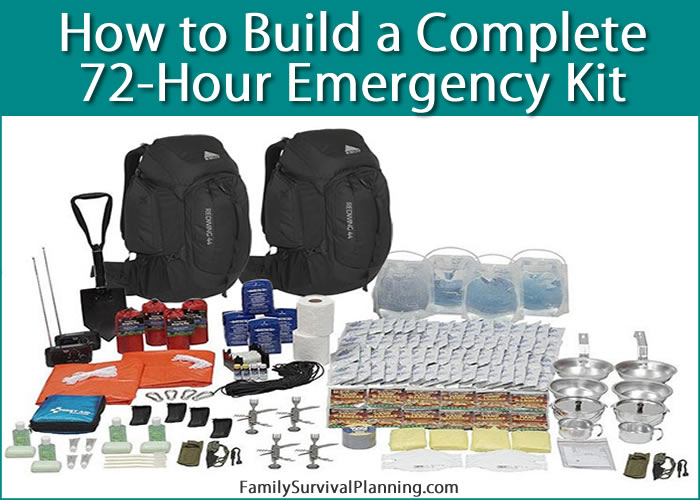
As I began to seriously build our 72-hour emergency preparedness kits (gathering a few supplies does not constitute a complete kit), I was overwhelmed by the lists and lists I found on many websites (see Resources below).
I was well aware that this kit/bag needed to contain enough basics to survive for a minimum of 72 hours. I also understood that all of it had to be at least a little bit organized, then squeezed into some kind of portable container small enough to carry (depending on how many pounds each person can carry) but not so small that it wouldn't hold all we needed.
Invest in emergency food storage now and enjoy peace of mind for the next 25 years. Don't miss out on the savings!
Where to start?
First, I laid out our meager supplies on the floor.
Then I began gathering lists from various places to give me some ideas for items we might need. To help me customize the lists for our needs, I made a list of possible scenarios or disasters that "could" happen in our particular area that would force us to leave home with bags in tow.
There are many situations where we might need a bugout bag (not just during a disaster). For instance, what if we were out in the middle of nowhere and the car broke down? Or what if we're out for a day of hiking and a child falls and needs first aid? I would want a kit in my car for times like that.
1. Choosing a Container
I read that we shouldn't wait until we have the perfect container to start our emergency bag, but to begin by assembling the items and then find a container to hold everything.
Then I read that we should find a container (backpack, suitcase, tub with wheels), that we are able to carry or pull. This would be based on our size and weight, strength, back issues or not, and age.
Another really good way to get started is to purchase a basic emergency kit online from a preparedness store or Amazon. They have inexpensive ones with just the basics, all the way up to expensive with everything you might need, if you just want to cut through to "done".
Whichever way you choose to start is up to you — just do start! I chose to gather a few supplies and then I discovered that the backpacks we already had were not going to hold everything,
I went shopping for a better one to suit our needs.
My first criteria for a container was that it must be portable. Waterproof would be good also.

Pockets and More Pockets
I looked at many backpacks, and considering the long lists of things to put in the BOBs, I looked for packs with lots of pockets to help me be more organized.
Having many pockets helps to separate items by categories or usage. For instance, one pocket could hold all the cooking supplies, one could hold ponchos and space blankets for shelter. (You get the idea.)
In a crisis, we would need to be able to find certain items and my mind remembers better if there's a bit of organization.
M.O.L.L.E. Capabilities
Next, I wanted one with M.O.L.L.E. (Modular Lightweight Load-carrying Equipment) capabilities to attach additional pouches if necessary.

Other features that appealed to me were the water bladder pocket, a mesh pocket, 3 handles, 2 back straps that can be hidden inside, and M.O.L.L.E straps in the front and at the bottom.
When planning the contents of your 72-hour kit, remember if it is only for three days max, don't over pack.
You can buy basic, inexpensive pre-filled kits for each family member that has most of what is needed to sustain one person for 72 hours, including items for warmth and shelter, heat and light, food and water, personal hygiene, a first aid kit, and even a nylon tote bag to neatly contain everything.
You can also purchase more extensive kits that include just about everything except a change of personal clothing (which you could add).
2. Food for Energy and Sustenance
What about calories?
Calories are the fuel that gives us energy which keeps our bodies functioning. We can go a couple of weeks without food but it sure wouldn't be fun.
There are plenty of options but it's best to choose foods that need no preparation - no cooking, no mixing, not even dishes or utensils. Try to aim for 2,000 calories per person (adults) per day and approximately 1,200 for small children.
Freeze Dried Foods For Convenience
Freeze dried foods are easy - just mix some warm water (or cold works too - although a main course meal may not be as tasty cold) to rehydrate and then eat it. The individual pouches do take up some room in the pack, but are perfect because of their storage length, light weight, and fast prep. Make sure you include a spoon or fork (or spork) for any foods you pack.
Emergency Essentials and Valley Food Storage both have a large variety of pouches that are perfect for an emergency pack. They include vegetables, fruits, main courses, breakfast foods, and drinks. Each pouch has from 8 to 12 servings in each. So three or four pouches, one breakfast, one main course, one fruit and, one vegetable, would last one person more than three days.
Healthy Snacks
It's best to eat as healthy as possible. Whole grains, nuts, etc. will keep energy level up and provide the necessary fats, proteins, and nutrients needed during stressful times.
Suggested Foods and Snacks
Here's a sampling of possible foods for a three-day supply, per person, when no refrigeration or cooking is available.
- Protein/Granola Bars
- Trail Mix/Dried Fruit
- Crackers/Cereals (for munching)
- Canned Tuna, Beans, Turkey, Beef, Vienna Sausages, etc ("pop-top" cans that open without a can-opener are good - just check often for leakage.)
- Candy (not anything that will melt) and gum
Always Rotate Foods
More than any other part of your emergency kit, all foods need to be rotated to make sure it's fresh and safe. Check your pack and rotate as necessary at least every six months.
The freeze dried foods, however, do not need to be rotated for 25 years. (How's that for shelf life of a pouch?)
Download a sample menu and shopping list here.
3. Water
How Much is Enough?
Water can be quite heavy so how much should we put into our packs? A minimum would be about 16 ounces per day, per person depending on the weight of your pack. A quart canteen is also a good item to have (and can attach to a M.O.L.L.E. pack). This is barely enough water for drinking so you may need a way to purify extra water.
Water container options:
- water pouches (4 ounces each)
- canned water (24 ounces each)
- quart-size canteen
Canned water is a bit too heavy (the cans) for 72 hour kits but water pouches work well. You can purchase these at Emergency Essentials by the case.
I do not recommend store-bought bottled water for two reasons:
- There is no guarantee that the water is pure;
- The plastic is so flimsy these days that they may burst inside your pack if packed too tightly or bumped for some reason. (Dasani brand are sturdier than most.)
Water Purifiers and Filters
Since we can't carry as much water as we may need, the next best thing is to have a way to purify water that may be in a pond, river, lake or other source close by.
There are several ways to purify water, the most basic being to boil it, which requires building a fire or having some kind of stove.
Some options that will save having to make a fire:
- Potable Aqua Water Purification Tablets - Each tablet purifies 1 liter or 1 quart of water; safe; no chlorine or iodine taste.
- Aquamira Chlorine Dioxide Water Treatment - This water preserver will extend the shelf life of your water storage and prevent the need for it to be rotated. Treats up to 30 gallons of water.
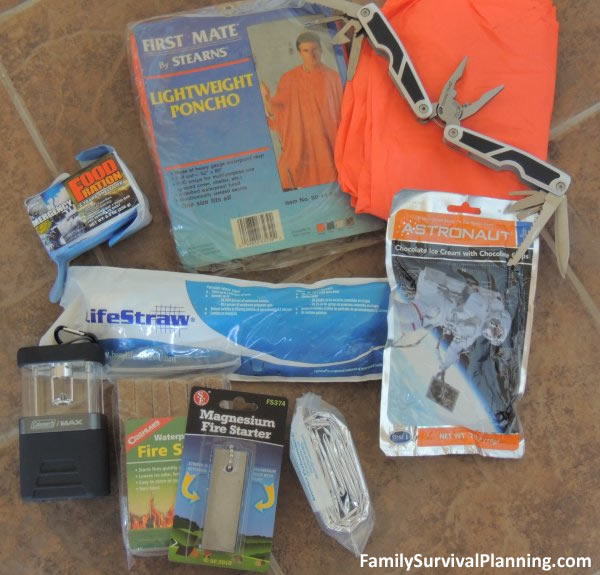
- SteriPen Water Purifiers use ultraviolet technology and it's fast! (purifies 16 ounces in 48 seconds). There are several types available, plus a pre-filter, a solar charger, and a hand-powered battery-free UV version. (Read more about the SteriPen here.)
- GRAYL - Grayl water purifiers provide protection from all waterborne pathogens (virus, bacteria, protozoan cysts) plus chemicals, heavy metals, pesticides, herbicides, and microplastics. It only takes 8 seconds to press 24 ounces of unsafe water into drinkable water. After purifying 65 gallons, it's time to replace the filter, available on the Grayl website.
- Katadyn Water Filters - We purchased a Katadyn Vario Water Filter and love it! There are several sizes that are perfect for 72-hour kits, like the Hiker Pro model (weighs only 11 ounces), Katadyn BeFree, which is a collapsible 1.0L hydrapak soft bottle flask packs down small to fit in tight spaces.
- LifeStraw - Lightweight, takes up very little space, and filters up to 260 gallons.
- Coffee filters - Pack a few - they're good for filtering out sediment.
4. Shelter and Warmth
When talking about shelter and warmth, keep in mind that the items are only for a temporary emergency situation, must fit in your pack, and can't be too heavy or bulky.
What You Need
The supplies needed for shelter and warmth should be geared to the area where you live or will evacuate to. For instance, I live in Utah where we have four seasons; therefore, I need to pack my kit with all four seasons in mind.
That means we need a lightweight tent, a large poncho or space blanket, and some kind of lightweight sleeping bag. Also pack a change of clothing - flannel shirt, sweatshirt, hat, and gloves if you live in a 4-season area.
Answer these questions before buying supplies for warmth and shelter:
- What do you need for your area?
- What is your year-around weather pattern?
What and where to buy
Because we're trying to make our packs as lightweight as possible, it may be necessary to buy some new items even if you already own tents and sleeping bags.
A lightweight tent (often called a tube tent) from an emergency supply store is inexpensive - runs about $6-$8. They are extremely lightweight and not sturdy enough to use more than a couple of times unless you're very careful with them. But they will work just fine in an emergency. They're about 8 feet long and are reported to sleep two. I would say they will sleep two small people or one big and one small (mother and child, dad and child).
The same applies to sleeping bags - heavy ones are not for a bug-out-bag. Some sleeping bags meant for backpackers are pretty lightweight and would work if you feel they don't add too much weight to your pack. Otherwise, buy an inexpensive survival sleeping bag (about $7-$14), then pack a lightweight fleece blanket for more warmth.
It's also good to have several space blankets. They really do keep you warm even though they seem really thin. There are also some that are lined with a polyester film to help retain body warmth. These cost about $3-$5.
There are many places to find these inexpensive items, such as Walmart, Amazon, any preparedness store, like Emergency Essentials, and sporting/camping stores. If there is an Army-Navy Surplus store in your area, they have lots of great supplies, usually at reasonable prices.
Suggestions for each bag:
- lightweight tent
- survival sleeping bag
- space blanket
- poncho (could be a large garbage bag)
- lightweight blanket
- lightweight ground cloth
- change of clothing (including socks and underwear)
- 2 - Pairs of Hand Warmer Heat Packs
- 2 - 18 hr. Body Heat Packs
You may not need everything on this list. Decide what works for your area and the weight of your bag.
5. Cooking, Fuel and Light
Since you are packing only for three days, find the smallest items available to keep your pack as light as possible.
Cooking Stoves

There are many options for small stoves to heat water for a freeze-dried meal, a warm cup of coffee or chocolate, or an MRE.
For a 72-hour kit, a stove needs to be lightweight and as small as possible. The simple stove that folds flat would be perfect.
The versatility of a stove like this is that you can use the fuel disks (even pieces of them), wood sticks, fuel tablets, or charcoal briquettes. Use it as shown for larger pans or turn it over for smaller pans. Just set a pan on top and you're ready.
Fire and Fuel
- Box of Waterproof Matches - Only need about 30 matches per pack
- Fuel disks, Sterno, fuel tablets
Lighting
- Head lamp for a hands-free light source
- Flashlights with batteries
- 2 - 12 hr. Instant Lightsticks
- Flares
- Candles
- Lighters
Most of these items are pretty common and can be purchased at a sporting and camping store, Army/Navy Surplus store, Amazon, and even Walmart.
6. Equipment and Tools
When gathering tools and equipment, choose items that will fit in your pack and are not too heavy or bulky. Look for small versions of items when appropriate.
What to Get
Some of these tools will not be necessary in the kits of every family member. For instance: you would not need a hatchet in a child's kit, nor probably any super glue.
Most of tools and equipment on this list should go into Mom and Dad's packs, with certain small items in a child's pack, such as a survival whistle.
These tools and equipment items could possibly be the most expensive items in your 72-hour kits, unless you already happen to have many of them already.
- Can Opener (if needed)
- Dishes/Utensils - paper plates and a spork should be enough. If packing freeze dried foods, all you'll need is a spork as the package itself can be used to heat and eat.
- Shovel
- Radio (solar, wind-up, and batteries)
- Pen and Paper
- Axe
- Pocket Knife
- Paracord
- Super Glue or Gorilla Glue
For a more extensive list: Download a Tools & Equipment Supplies Checklist
7. Personal Supplies and Medication
Choose only what you think you will need in a 72-hour period.
What to Get
A first aid kit is the most important personal item. Try to find one that comes in a soft-sided container with at least 60 different items. Or you can buy items one at a time, however, I believe it's less expensive to just buy a kit.
The other personal items are . . . well, they're personal. And since they are personal, pack what fits your area and lifestyle. You probably have most of these items around your house or can be purchased at the grocery store, Walmart, camping store, Army/Navy store, or emergency preparedness store.
- First Aid Supplies
- Toiletries (roll of toilet paper- remove the center tube to easily flatten into a zip-lock bag, feminine hygiene, folding brush, etc.)
- Cleaning Supplies (mini hand sanitizer, soap, shampoo, dish soap, etc.)
- Medication (appropriate for your family)
- Prescription Medication (for 3 days)
- Extra eye glasses or contacts.
- Assorted sizes of plastic bags (can be used for storage, sanitation, garbage, etc.)
- Infant Needs (if applicable)
Download a Personal Supplies Checklist
8. Personal Documents and Money
Personal documents for your 72-hour kit can be a challenge, depending on how many documents you might need. Hopefully, you have already assembled a family planner and gathered all important documents into a binder of some kind. That will make this part easier.
What to Include
- Copies of legal documents such as birth/marriage certificates, wills, passports, insurance policies and forms, stored in water proof zip lock bags. (See the Family Documents Emergency Planner for more detail for your documents.)
- Credit Card and credit card information stored in water proof zip lock bags
- Pre-Paid Phone Cards
- Immunization records
- CASH - keep a variety of small bills on hand.
- Vaccination Papers
- Insurance Policies
Download: The Complete Family Emergency Planner (eBook)
Challenge Your Family
Take your now completed 72-hour kit for a test drive. Take it camping and use it, or create a test run for the whole family. Make sure everyone knows how to use each item and that each item works as it should.
If you actually take it on a short camping trip, not taking any other camping equipment besides your bug-out-bag, you will know for sure that you have what you need and that everything works.
Final Notes:
- Update your 72 Hour Kit every six months (put a note in your calendar/planner) to make sure that: all food, water, and medication is fresh and has not expired; clothing fits; personal documents and credit cards are up to date; and batteries are charged.
- Small toys/games are important too as they will provide some comfort and entertainment during a stressful time.
- Older children can be responsible for their own pack of items/clothes too.
Personalize this 72 hour kit list for your family. Add or subtract according to likes, dislikes, and needs of each person.
Resources:
The Red Cross: redcross.org/prepare/location/home-family/get-kit
FEMA: ready.gov/kit
You might like these:
How to Survive An Earthquake
Earthquake survival - What to do before, during and after. What should be in your earthquake survival kits.
4 Best Ways to Purify Water From Any Source
It is becoming necessary to learn water purification methods for safe drinking water in most parts of the world — and maybe even right out of your tap.
Your Auto Emergency Kit Could Save Lives
Auto emergency kits could save lives in a crisis,or be a 'get home' bag in a grid-down situation.


What do you think?
I’d love to hear what you have to say in the comments.
What Other Visitors Have Said
Click below to see contributions from other visitors to this page...
Shane
I like the tactical backpack suggestions but have opted for a low profile backpack. This makes me feel a little safer if I am not drawing attention to …


 Valley Food Storage


As an Amazon Associate, Family Survival Planning earns a small commission from qualifying purchases.
FTC DISCLOSURE
If you make a purchase via a link on this site,
I may receive a small commission on the
transaction, at no added cost to you.
Copyright ©2007 - 2021 FamilySurvivalPlanning.com. All rights reserved.